今やCSS(スタイリング)と言えばTailwind CSS一強になった感じがありますね、AIがTailwind CSSを得意なのも一強をブーストしているようです。
ただし、Tailwind CSSは基本的にはデザイナー用に作られたスタイリング言語ですよね、私のようにコードは書けるけど画面をデザイン出来ない人間には敷居が高いところがあります。昔ブログにも書きましたね。
今回、daisyUIを使ってみたところ良いなと思ったので記事にしてみました。
 Bing Image Creatorが生成した画像を使っています
daisyUIとは
daisyUI とは? Tailwind CSS のプラグインとして動作する CSSクラス名のコレクションです。Tailwind CSS のユーティリティクラスを高レベルに抽象化したもので、NPMパッケージとしてインストールし、Tailwind CSS のプラグインとして追加するだけで使えます。
メリット
- 大量のユーティリティクラスを繰り返し書く必要がなくなる
card、button、toggleのようなセマンティックなクラス名でUIを構築でき、コードの可読性・保守性が向上- ダークモードや多数のテーマが最初から利用可能(30以上のビルトインテーマ)
- 開発スピードとカスタマイズ性を両立
Tailwind CSS との違い Tailwind CSS は1つのCSSルールに対応する低レベルなユーティリティクラスを提供。daisyUI は複数のCSSルールをまとめた高レベルなクラス名を提供します。daisyUI で大枠のUIパーツを作り、Tailwind CSS で細かいカスタマイズを行うという使い分けです。Tailwind CSS の代替ではなく拡張という位置づけ。
Atomic Design との関係 Tailwind CSS のユーティリティクラスが「Atom(原子)」、daisyUI のクラスが「Molecule/Organism(分子/有機体)」に相当します。
その他のポイント
- 無料・オープンソース(MITライセンス)
- フレームワーク非依存 — React、Vue、Svelte など CSS が使えるあらゆる環境で利用可能
- Tailwind CSS なしでも単体利用は可能(ただしレイアウト用にTailwind併用が推奨)
- 現在のバージョンは 5.5.18
以上、AI(Claude Opus4.6)にまとめてもらいました。
<button className="btn btn-primary">Primary</button>
daisyUIはUIコンポーネント・ライブラリーなので、上コードを書くだけで、下のようなデザインされたButtonが表示されます。

いつものジャンケンアプリをdaisyUIで作ってみた
最近Next.jsは飽きたので、今回はViteベースで作りました。
React以外に使ったライブラリーは以下です、
- daisyUI : 今回のメインですね
- TanStack Router : ルーティングのライブラリーです
- Vite Server Actions : ViteのServer Compnent(Server Function)は現在開発中なのですが、これを使うとServer Functionが簡単に使えるライブラリーです
daisyUIはデザインの入ったUIコンポーネント・ライブラリーなので、見た目は従来のTailwind CSS版と完全に同じものは目刺しませんでした。
結果
見て判るよう、daisyUIを使うとCSSの指定が圧倒的に短くなります。
Tailwind CSSは整理されたCSSですが、レイアウト、 配置、大きさ・・・など多種の指定があり、素のCSSに比べれば読みやすいですが、長いCSS指定の集まりは理解し難くなります。しかし、daisyUIを使うとボタンを作るCSSの基本部分はbtn置き換えられ、それ以外の配置などのCSS指定のみになります。
また、いくらAIがコードを書いてくれるとは言えメンテナンスは人間が行う事もあると思いますし、トークン数が減るのでAIのコストの下がり生成時間の短縮にもつながると思います。ちなみにClaude Opus4.6でdaisyUIを使ってくれと指示したところ正しく使ってくれました。
ジャンケンのボタン
Tailwind CSS版
export default function JyankenBox ({pon}: JyankenBoxProps) {
    const buttonClass = `text-white text-center text-sm rounded w-16 px-2 py-2
    bg-blue-600 hover:bg-blue-700 shadow shadow-gray-800/50`;

  return (
    <div className="w-57.5 mx-auto flex mb-10">
      <button type="button" onClick={() => pon(Te.Guu)} className={buttonClass}>
        グー
      </button>
      <button type="button" onClick={() => pon(Te.Choki)} className={`${buttonClass} mx-5`}>
        チョキ
      </button>
      <button type="button" onClick={() => pon(Te.Paa)} className={buttonClass}>
        パー
      </button>
    </div>
  );
}
daisyUI版
export default function JyankenBox ({pon}: JyankenBoxProps) {
  return (
    <div className="w-57.5 mx-auto flex mb-10">
      <button onClick={() => pon(Te.Guu)} className="btn btn-primary">グー</button>
      <button onClick={() => pon(Te.Choki)} className="btn btn-primary mx-5">チョキ</button>
      <button onClick={() => pon(Te.Paa)} className="btn btn-primary">パー</button>
    </div>
  );
}
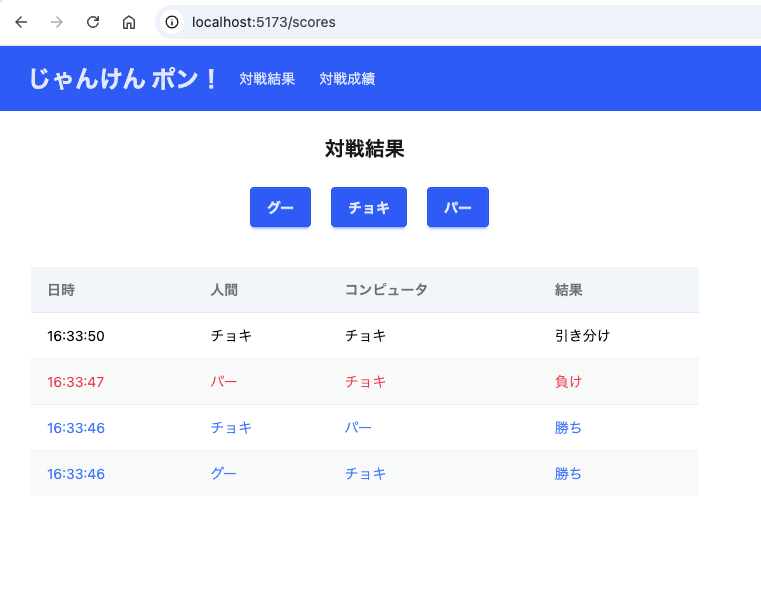
ジャンケンの結果表示
Tailwind CSS版
export default function ScoreBox ({scores}: ScoreBoxProps)  {
  const dateHHMMSS = (d: Date) => d.toTimeString().substring(0, 8);

  return (
    <table className="w-full text-sm text-left text-gray-500">
      <thead className="bg-slate-100 border">
        <tr>
          <th className="px-6 py-3">時間</th>
          <th className="px-6 py-3">人間</th>
          <th className="px-6 py-3">コンピュータ</th>
          <th className="px-6 py-3">結果</th>
        </tr>
      </thead>
      <tbody className="bg-white border">
        {scores.map((score, ix) => {
          const tdClass = `px-2 md:px-6 py-4 ${JudgmentColor[score.judgment]}`;

          return (
            <tr key={ix} className={`bg-white border-b`}>
              <td className={tdClass}>{dateHHMMSS(score.matchDate)}</td>
              <td className={tdClass}>{teString[score.human]}</td>
              <td className={tdClass}>{teString[score.computer]}</td>
              <td className={tdClass}>{judgmentString[score.judgment]}</td>
            </tr>
          );
        })}
      </tbody>
    </table>
  );
}
daisyUI版
export default function ScoreList ({scores}: ScoreListProps)  {
  const dateHHMMSS = (d: string) => d.substring(0, 8);

  return (
    <table className="table table-zebra">
      <thead className="bg-slate-100 border">
        <tr>
          <th>日時</th>
          <th>人間</th>
          <th>コンピュータ</th>
          <th>結果</th>
        </tr>
      </thead>
      <tbody>
        {scores.map((score, ix) => (
          <tr key={ix} className={JudgmentColor[score.judgment]}>
            <td>{dateHHMMSS(score.matchDate)}</td>
            <td>{teString[score.human]}</td>
            <td>{teString[score.computer]}</td>
            <td>{judgmentString[score.judgment]}</td>
        </tr>))}
      </tbody>
    </table>
  );
}
アプリケーション・バー
Tailwind CSS版
export default function ApplicationBar() {
  const linkCSS = "py-2 px-3 text-blue-100 rounded hover:bg-blue-700";
  return (
    <nav className="bg-blue-600 border-gray-50">
      <div className="max-w-screen-xl flex flex-wrap items-center mx-auto p-3">
        <h1 className="ml-5 text-2xl font-bold text-white">じゃんけん ポン!</h1>
          <ul className="font-medium flex p-2 bg-blue-600">
            <li><Link to="/scores" className={linkCSS}>対戦結果</Link></li>
            <li><Link to="/status" className={linkCSS}>対戦成績</Link></li>
          </ul>
      </div>
    </nav>
  );
}
daisyUI版
export default function ApplicationBar() {
  return (
    <div className="navbar bg-primary text-primary-content">
      <div className="flex flex-wrap">
        <h1 className="ml-5 text-2xl font-bold">じゃんけん ポン!</h1>
      </div>
      <div className="flex-none">
        <ul className="menu menu-horizontal px-1">
          <li><Link to="/scores">対戦結果</Link></li>
          <li><Link to="/status">対戦成績</Link></li>
        </ul>
      </div>
    </div>
  );
}
おまけ: TanStack Router
TanStack Routerのloader機能を使うと、useStateやuseEffectが不要になり、コードがスッキリしますね。→ ①、②
また、router.invalidate()を使うことで現在の画面をリロードできます。 → ③
// import は省略

export const Route = createFileRoute('/scores')({
  component: Scores,
  loader: async () => {                         // ← ①
    return { scores: await getScores() };
  }
});

function Scores() {
  const router = useRouter();
  const scores = Route.useLoaderData().scores;  // ← ②

  const pon = async (human: Te) => {
    await addPon(human);
    router.invalidate();                        // ← ③
  };

  return (
    <>
      <SubHeader title="対戦結果" />
      <JyankenBox pon={pon} />
      <ScoreList scores={scores}/>
    </>
  )
}
おまけ: vite-plugin-server-actions
現在、Vite用の公式なReact Server Components(React Server Function)は開発中なようです。今回のアプリではReact Server Functionを使いたかったので、Vite Server Actionsを使ってみました。
Vite Server Actionsを使うには、
1. インストール・設定
npm install vite-plugin-server-actionsでVite Server Actionsをインストールし、Vite設定ファイル(vite.config.js)にserverActions()を追加。
// importは省略

export default defineConfig({
  plugins: [
  ・・・省略・・・

    serverActions({
      openAPI: {
				enabled: true,
      }
    })
  ]
})
serverActions()にはいろいろとオプションがあり、OpenAPIをenabledをtrueに設定すると、通信で使うAPIドキュメントを http://localhost:5173/api/docs で見る事ができます。→ オプションの説明
2. Server Functionの作成
Server Functionのファイル名は〜.server.tsにする必要があります。また、同期的な関数でも非同期処理(async、await)にする必要があります。
const scores: Score[] = [];

// ・・・省略・・・

// 全対戦結果を取得する
export async function getScores(): Promise<Score[]> {
  return scores;
}

// じゃんけんを1回実行し、結果を記録する
export async function addPon(human: Te): Promise<void> {
  const computer = randomHand();
  const judgment = judge(human, computer);

  const score = {human, computer, judgment,
                 matchDate: (new Date()).toTimeString()};
  scores.unshift(score);
}
3. Server Functionの呼出し
Server Functionの呼出しは通常の(非同期)関数呼び出しです。
当然、Server Functionの呼出しは通信が入ります。通信はJSONフォーマットを使っているためにDateオブジェクトは正しく
伝わりません(文字列に変換されてしまいます)。
const scores = await getScores();
await addPon(human);
まとめ
Webデザイン能力が無いプログラマーがTailwind CSSを使うなら、daisyUIを組み合わせるべきです。
AIにコードを書かせる場合でも使いましょう、Claude Opus4.6はdaisyUIを使ってくれと指示すると正しく使ってくれました。