ネット上の記事を読んでいたら、最近のRuby on Rails上でのReact開発環境がかなり良くなったらしい事を知りました。
私はバックエンドにRuby on Railsを使ってReactでフロントエンドを作る場合は、RailsのReact統合機能は使わずにReactの開発環境はRailsとは独立したプロジェクトと作ってきました。
RailsとReactは別の世界観を持ち、違う開発チームがメンテナンスしているフレームワークなので無理に統合する必要はないと思っていたからです。
しかし上手く統合できるなら開発も楽になり、より良いアプリが容易に作れると思います。
今回取り上げる技術は、
- vite_rails : フロントエンド(React)開発環境ViteをRailsに統合するツール
- Inertia.js : Railsのようなフレームワークにフロントエンド(SPA)をシームレスに接続するライブラリー
です。今回のブログはvite_railsです。
 Gemini 2.5 Flash Imageが生成した画像をもとにしています
vite_rails (Vite Ruby)とは
vite_railsフロントエンド(React)開発環境ViteをRailsに統合するツールです。 RackベースのRubyアプリとViteを統合するツールVite Rubyの1部でRails専用に作られています。
ViteはVue.js、React等のフロントエンドの開発ツールです。Vue.jsの開発者によって作られたツールでVue.jsでは標準の開発ツールですし、ReactでもNext.jsに次いで使われている開発ツールです。
SSRやRSC等の複雑(?)な機能を使わないシンプルなReactアプリが快適に開発できる環境で、私も大好きです。
昔のRailsに在ったフロントエンド統合環境Webpackerはwebpackの複雑さやビルドの遅さ等からあまり評判が良くなかったようですが、vite_railsはViteのシンプルさ高速さを簡単に利用できます。
サンプルアプリが出来るまで
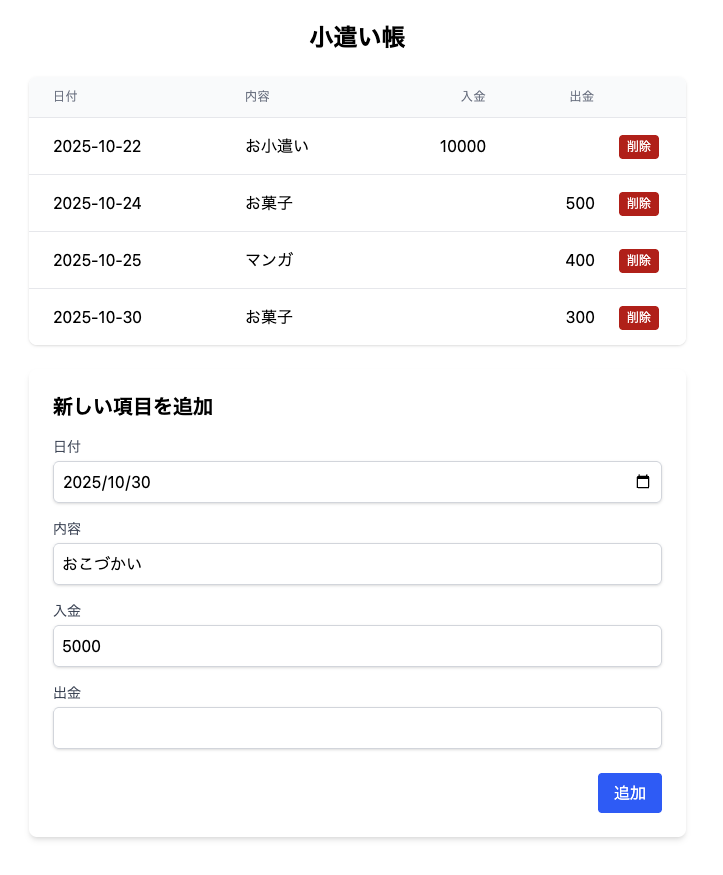
以前Pythonで使った小遣い帳アプリと同じようなアプリを作る事にしました。
まずはRuby on Rails
Ruby on Railsのプロジェクト作成はシンプルで良いですね。😄 ただし、デフォルトで入るHotwire(JavaScript)を入れないようにしました。
$ rails new allowance_book --skip-hotwire
$ cd allowance_book
$ rails g scaffold book date:date description:string money_in:integer money_out:integer
$ rails db:migrate
$ bundle add rack-cors
$ rails s
独立したReactアプリからAPI呼出しするので、CROS対応のためにrack-corsをインストールしました。 最終的にvite_railsを使えば、このCROS対応は不要になります。
- config/initializers/cors.rb
Rails.application.config.middleware.insert_before 0, Rack::Cors do
  allow do
    origins "*"

    resource "*",
      headers: :any,
      methods: [:get, :post, :put, :patch, :delete, :options, :head]
  end
end
さらにCSRF対策をオフにしました。これは一時的な対応で、Inertia.jsを使うとCSRF対策をオンにできす。
- app/controllers/books_controller.rb
class NotVerifyStrategy                           # ← CSRF対策用チェックをしないクラスを追加
  def initialize(controller)
    @controller = controller
  end

  def handle_unverified_request
  end
end

class BooksController < ApplicationController
  protect_from_forgery with: NotVerifyStrategy   # ← この行を追加

  ・・・
vite_railsをインストール
いよいよRailsプロジェクトにvite_railsをインストールします。
$ bundle add vite_rails
$ bundle exec vite install           # ここで設定ファイル等が作成されます
$ bin/vite dev
Viteの開発サーバーがhttp://localhost:3036/vite-dev/が起動されます、これでReactコードの作成、
HMR(Hot Module Replacement )を行ってくれます。アプリはrails sで動作します。
別ターミナルで、サーバーを起動
$ rails s
ここで、http://localhost:3000/booksをアクセスしすると、app/javascript/entrypoints/application.jsに書かれている以下のコードが実行されので、ブラウザーのConsoleにVite ⚡️ Rails と表示されています。
// To see this message, add the following to the `<head>` section in your
   ・・・

console.log('Vite ⚡️ Rails')

   ・・・
ちなみに、HMRが行われるのでapp/javascript/entrypoints/application.jsファイルを変更・保存すると、リロードしなくてもConsole表示が変更されます。
独立したReactアプリをViteで作る
vite_railsを使うのは初めてなので、まずは独立したReactアプリをViteで作りました。Tailwind CSSを使います。
$ npm create vite@latest front_allowance_book  -- --template react-ts
$ cd front_allowance_book
$ npm install
$ npm install tailwindcss @tailwindcss/vite
- vite.config.ts
import { defineConfig } from 'vite'
import react from '@vitejs/plugin-react'
import tailwindcss from '@tailwindcss/vite'

// https://vite.dev/config/
export default defineConfig({
  plugins: [
    react(),
    tailwindcss(),
  ],
})
このReactのコードは、API通信でデータを取得して表示し、さらにデータの削除や追加が出来るシンプルなReactアプリです。
VS CodeのAI補完(GitHub Copilot)が30%くらい書いてくれました。😄
- src/App.tsx
import { useEffect, useState } from 'react';

type BookType = {
  id: number
  date: string
  description: string
  money_in: number|null
  money_out: number|null
};
type BookCreateType = Omit<BookType, 'id'>;

const SERVER_URL = 'http://localhost:3000';

const getAllBooks = async (): Promise<BookType[]> => {
  const response = await fetch(`${SERVER_URL}/books.json`)
  if (!response.ok) {
    throw new Error('Failed to fetch books')
  }
  return response.json()
}

const deleteBook = async (bookId: number): Promise<void> => {
  const response = await fetch(`${SERVER_URL}/books/${bookId}`, {
    method: 'DELETE',
  })
  if (!response.ok) {
    throw new Error('Failed to delete book')
  }
}

const PostBook = async (book: BookCreateType): Promise<void> => {
  const response = await fetch(`${SERVER_URL}/books`, {
    method: 'POST',
    headers: {
      'Content-Type': 'application/json',
    },
    body: JSON.stringify({ book }),
  })
  if (!response.ok) {
    throw new Error('Failed to create book')
  }
}

function App() {
  const [books, setBooks] = useState<BookType[]>([])

  useEffect(() => {
    (async() => {
      setBooks(await getAllBooks())
    })()
  }, []) ;

  return (
    <div className="mx-2 md:mx-8 md:w-1/2">
      <h1 className="my-6 text-center text-2xl font-bold">小遣い帳</h1>
      <AllowanceBookList books={books} onDeleteBook={async(bookId:number) => {
        await deleteBook(bookId);
        setBooks(await getAllBooks());
      }} />
      <AllowanceBookEntry onAddBook={async(newBook: BookCreateType) => {
        await PostBook(newBook);
        setBooks(await getAllBooks());
      }} />
    </div>
  )
}
export default App;

function AllowanceBookList({ books, onDeleteBook }:
    { books: BookType[], onDeleteBook: (bookId: number) => void }) {
  return (
       <table className="mt-4 min-w-full divide-y divide-gray-200 shadow-sm rounded-lg overflow-hidden">
        <thead className="bg-gray-50">
          <tr>
            <th className="px-6 py-3 text-left text-xs font-medium text-gray-500 uppercase tracking-wider">日付</th>
            <th className="px-6 py-3 text-left text-xs font-medium text-gray-500 uppercase tracking-wider">内容</th>
            <th className="px-6 py-3 text-right text-xs font-medium text-gray-500 uppercase tracking-wider">入金</th>
            <th className="px-6 py-3 text-right text-xs font-medium text-gray-500 uppercase tracking-wider">出金</th>
            <th className="px-6 py-3 text-right text-xs font-medium text-gray-500 uppercase tracking-wider"></th>
          </tr>
        </thead>
        <tbody className="bg-white divide-y divide-gray-200">
          {books.map((book) => (
            <tr key={book .id}>
              <td className="px-6 py-4 whitespace-nowrap">{book.date}</td>
              <td className="px-6 py-4 whitespace-nowrap">{book.description}</td>
              <td className="px-6 py-4 whitespace-nowrap text-right">{book.money_in || ''}</td>
              <td className="px-6 py-4 whitespace-nowrap text-right">{book.money_out || ''}</td>
              <td>
                <DeleteButton onClick={() => onDeleteBook(book.id)} />
              </td>
            </tr>
          ))}
        </tbody>
      </table>
  );
}

function AllowanceBookEntry({ onAddBook }:
    { onAddBook: (newBook: BookCreateType) => void }) {
  const [date, setDate] = useState('');
  const [description, setDescription] = useState('');
  const [moneyIn, setMoneyIn] = useState('');
  const [moneyOut, setMoneyOut] = useState('');

  const handleSubmit = (e: React.FormEvent) => {
    e.preventDefault();
    const newBook: BookCreateType = {
      date,
      description,
      money_in: moneyIn ? parseInt(moneyIn) : null,
      money_out: moneyOut ? parseInt(moneyOut) : null,
    };
    onAddBook(newBook);
    setDate('');
    setDescription('');
    setMoneyIn('');
    setMoneyOut('');
  };

  return (
    <form onSubmit={handleSubmit} className="my-6 p-6 bg-white shadow-md rounded-lg">
      <h2 className="text-xl font-bold mb-4">新しい項目を追加</h2>
      <div className="space-y-4">
        <div>
          <label htmlFor="date" className="block text-sm font-medium text-gray-700">日付</label>
          <input type="date" id="date" value={date} onChange={(e) => setDate(e.target.value)} required
            className="mt-1 block w-full border border-gray-300 rounded-md shadow-sm p-2" />
        </div>
        <div>
          <label htmlFor="description" className="block text-sm font-medium text-gray-700">内容</label>
          <input type="text" id="description" value={description} onChange={(e) => setDescription(e.target.value)} required
            className="mt-1 block w-full border border-gray-300 rounded-md shadow-sm p-2" />
        </div>
        <div>
          <label htmlFor="moneyIn" className="block text-sm font-medium text-gray-700">入金</label>
          <input type="number" id="moneyIn" value={moneyIn} onChange={(e) => setMoneyIn(e.target.value)} className="mt-1 block w-full border border-gray-300 rounded-md shadow-sm p-2" />
        </div>
        <div>
          <label htmlFor="moneyOut" className="block text-sm font-medium text-gray-700">出金</label>
          <input type="number" id="moneyOut" value={moneyOut} onChange={(e) => setMoneyOut(e.target.value)} className="mt-1 block w-full border border-gray-300 rounded-md shadow-sm p-2" />
        </div>
        <div className="mt-6 text-right">
          <button type="submit" className="px-4 py-2 bg-blue-600 text-white rounded hover:bg-blue-700">
            追加
          </button>
        </div>
      </div>
    </form>
  );
}

function DeleteButton({ onClick }: { onClick: () => void }) {
  return (
    <button type="button" onClick={onClick} className="px-2 py-1 text-xs font-medium text-center text-white bg-red-700 rounded hover:bg-red-800">
      削除
    </button>
  );
}
- src/main.tsx (create viteが生成したコードのままです)
import { StrictMode } from 'react'
import { createRoot } from 'react-dom/client'
import './index.css'
import App from './App.tsx'

createRoot(document.getElementById('root')!).render(
  <StrictMode>
    <App />
  </StrictMode>,
)
- src/index.css
@import "tailwindcss";
いよいよvite_railsで統合
Reactアプリをコピー
$ cp 独立Reactアプリ/src/App.tsx app/javascript/src/
$ cp 独立Reactアプリ/src/index.tsx app/javascript/src/
$ cp 独立Reactアプリ/main.tsx app/javascript/entrypoints/
$ cp 独立Reactアプリ/tsconfig*.json ./
コピーしたmain.tsxのimportパスを変更
import { StrictMode } from 'react'
import { createRoot } from 'react-dom/client'
import '../src/index.css'                        // ← 変更
import App from '../src/App.tsx'                 // ← 変更

createRoot(document.getElementById('root')!).render(
  <StrictMode>
    <App />
  </StrictMode>,
)
独立Reactアプリのpackage.jsonをRails側のpackage.jsonにマージ
独立Reactアプリのpackage.json内容を元に、Rails側のpackage.jsonを作ります。
そこに、元々あったdevDependenciesの"vite-plugin-ruby": "^5.1.1"を追加するだけです。
- package.json
{
  "name": "allowance_book",
  "private": true,
  "version": "0.0.0",
  "type": "module",
  "scripts": {
    "dev": "vite dev",
    "build": "tsc -b && vite build",
    "lint": "eslint .",
    "preview": "vite preview"
  },
  "dependencies": {
    "@tailwindcss/vite": "^4.1.15",
    "react": "^19.1.1",
    "react-dom": "^19.1.1",
    "tailwindcss": "^4.1.15"
  },
  "devDependencies": {
    "@eslint/js": "^9.36.0",
    "@types/node": "^24.6.0",
    "@types/react": "^19.1.16",
    "@types/react-dom": "^19.1.9",
    "@vitejs/plugin-react": "^5.0.4",
    "eslint": "^9.36.0",
    "eslint-plugin-react-hooks": "^5.2.0",
    "eslint-plugin-react-refresh": "^0.4.22",
    "globals": "^16.4.0",
    "typescript": "~5.9.3",
    "typescript-eslint": "^8.45.0",
    "vite": "^7.1.7",
    "vite-plugin-ruby": "^5.1.1"
  }
}
その後npmライブラリーをインストールします。
$ npm install
独立Reactアプリのvite.config.tsをRails側のvite.config.tsにマージ
import { defineConfig } from 'vite'
import RubyPlugin from 'vite-plugin-ruby'
import react from '@vitejs/plugin-react'
import tailwindcss from '@tailwindcss/vite'

export default defineConfig({
  plugins: [
    RubyPlugin(),
    react(),
    tailwindcss(),
  ],
})
Rails設定の調整
http://localhost:3000/でReactが動作できるようにhome/index.html.erbを作成
$ rails g controller home index
- app/views/home/index.html.erb の変更
<div id="root"></div>
<%= vite_javascript_tag 'main.tsx' %>
- app/views/layouts/application.html.erb の変更(コメント行は省略しました)
<!DOCTYPE html>
<html>
  <head>
    <title><%= content_for(:title) || "Allowance Book" %></title>
    <meta name="viewport" content="width=device-width,initial-scale=1">
    <meta name="apple-mobile-web-app-capable" content="yes">
    <meta name="mobile-web-app-capable" content="yes">
    <%= csrf_meta_tags %>
    <%= csp_meta_tag %>
    <%= yield :head %>
    <link rel="icon" href="/icon.png" type="image/png">
    <link rel="icon" href="/icon.svg" type="image/svg+xml">
    <link rel="apple-touch-icon" href="/icon.png">

    <%= javascript_importmap_tags %>
    <%= vite_client_tag %>
    <%= vite_react_refresh_tag %>                    <%# ← 変更  %>
  </head>

  <body>
    <%= yield %>
  </body>
</html>
bin/vite dev、bin/rails s が動いていたら、再起動しましょう。http://localhost:3000/でReactアプリが動きます❗
アプリの動作確認ができたら、CROS対応は削除しましよう。bin/rails sを終了し。
$ bundle remove rack-cors
$ rm config/initializers/cors.rb
$ bin/rails s
今回はここまで。
まとめ
今回はReactアプリを別アプリとして作成してからマージしましたが、vite_rails自体はシンプルなので最初からRails + vite_railsで開発しても良かったと思いました。
次回は、Inertia.jsでReactとRailsでシームレスに接続したいと思います・・・